LED - Strips and diodes
LED diodes
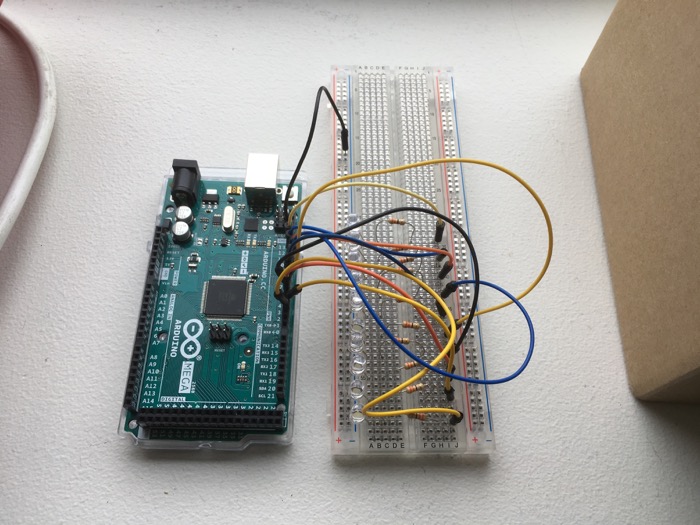
- To connect more LED diodes (not strips) than there is room for on an Arduino, you can use Arduino Mega or a shift register
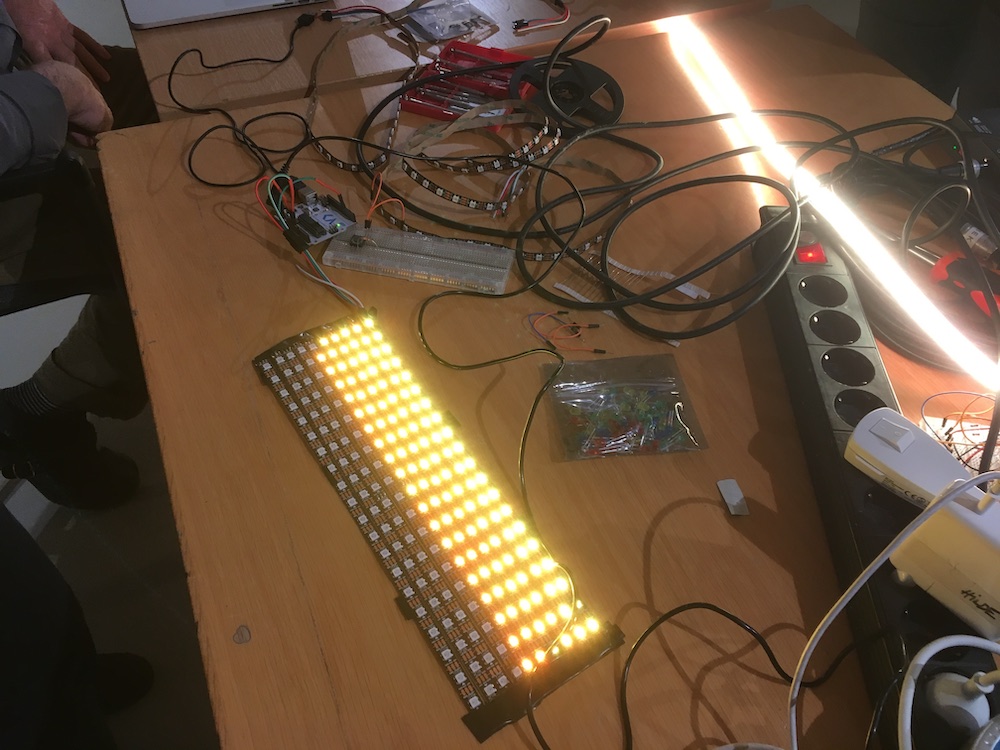
LED strips
Neopixel Arduino library
- Look for addressable and/or Neopixel compatible LED-strip when buying to use with Arduino.
- LED strip requires external power adapter in Arduino
- Can also be used with Teensy
- FastLED is an alternative library for Arduino and Teensy.
- LED-strips can be daisy chained by using connectors or soldering. They can also be cut by scissor and soldered together.
- To use LED-strips with DMX and software like Madmapper, VDMX or Resolume Arena, you can use the Art-net protocol.
- Buy good quality LED-strips from China
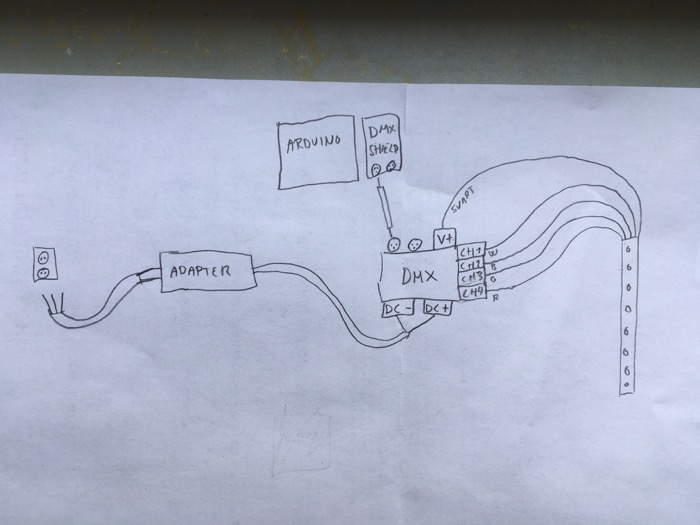
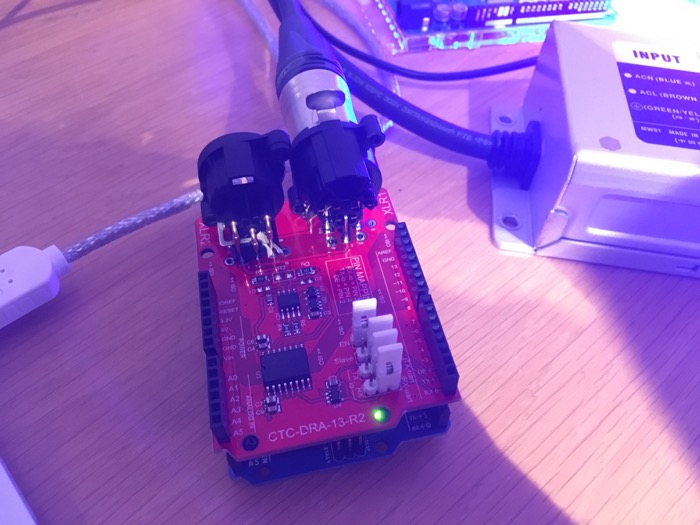
LED strip and DMX
- DMX shield
- DMX library for Arduino
- Remember to change number of channels: #define DMX_MASTER_CHANNELS -> 4 <-


Built-in LED
void setup() {
  // initialize digital pin LED_BUILTIN as an output.
  pinMode(LED_BUILTIN, OUTPUT);
}

// the loop function runs over and over again forever
void loop() {
  digitalWrite(LED_BUILTIN, HIGH);   // turn the LED on (HIGH is the voltage level)
  delay(1000);                       // wait for a second
  digitalWrite(LED_BUILTIN, LOW);    // turn the LED off by making the voltage LOW
  delay(1000);                       // wait for a second
}
One LED diode
int led = 3;
int brightness = 255;

void setup() {

  pinMode( led, OUTPUT );

}

void loop() {

  analogWrite( led, brightness );

}
LED diode fading
int led[] = {3, 4, 5, 6, 7, 8, 9, 10, 11, 12};
int numOfLeds = 10;
int brightness = 0;
int fadeAmount = 1;

void setup() {

  for ( int i = 0; i < numOfLeds; i++ ) {
    pinMode( led[i], OUTPUT);
  }

}


void loop() {

  for ( int i = 0; i < numOfLeds; i++ ) {

    analogWrite(led[i], brightness);

    brightness = brightness + fadeAmount;

    if (brightness <= 0 || brightness >= 255) {
      fadeAmount = -fadeAmount;
    }

  }

  delay(50);


}
Multiple LED diodes
int led[] = {3, 4, 5, 6, 7, 8, 9, 10, 11, 12};
int numOfLeds = 10;

void setup() {

  for ( int i = 0; i < numOfLeds; i++ ) {
    pinMode( led[i], OUTPUT);
  }

}


void loop() {

  // Her slukkes alle lys
  for ( int i = 0; i < numOfLeds; i++ ) {
    digitalWrite( led[i], LOW );
  }


  digitalWrite( led[0], LOW );
  digitalWrite( led[1], LOW );
  digitalWrite( led[2], LOW );
  digitalWrite( led[3], LOW );
  digitalWrite( led[4], LOW );
  digitalWrite( led[5], LOW );
  digitalWrite( led[6], LOW );
  digitalWrite( led[7], LOW );
  digitalWrite( led[8], LOW );
  digitalWrite( led[9], LOW );

  for ( int i = 0; i < numOfLeds; i++ ) {
    digitalWrite( led[i], HIGH );
    digitalWrite( led[i - 1], HIGH );
    digitalWrite( led[i - 2], HIGH );
    digitalWrite( led[i - 3], LOW );
    delay( 500 );
  }


}
LED-strip and button
#include "Adafruit_NeoPixel.h"
#ifdef __AVR__
 #include "avr/power.h"
#endif

const int buttonPin = 52;
int buttonState = 0;
const int ledPin =  13;
const int numOfLeds = 60;
const int ledStripPin = 51;

Adafruit_NeoPixel pixels( numOfLeds, ledStripPin, NEO_GRB + NEO_KHZ800);

void setup() {

#if defined(__AVR_ATtiny85__) && (F_CPU == 16000000)
  clock_prescale_set(clock_div_1);
#endif

  pixels.begin();

  pinMode(buttonPin, INPUT);
  pinMode(ledPin, OUTPUT);

}

void loop() {

  buttonState = digitalRead(buttonPin);

  if ( buttonState == LOW ) {

    digitalWrite(ledPin, LOW);

    for ( int i = 0; i < numOfLeds; i++ ) {
      pixels.setPixelColor( i, pixels.Color( 255, 0, 0 ) );
    }

    pixels.show();

  } else {

    for ( int i = 0; i < numOfLeds; i++ ) {
      pixels.setPixelColor( i, pixels.Color( 0, 255, 0 ) );
    }

    pixels.show();

    digitalWrite(ledPin, HIGH);

  }

}
LED-strip DMX master
/*
  DMX_Master.ino - Example code for using the Conceptinetics DMX library
  Copyright (c) 2013 W.A. van der Meeren danny@illogic.nl.  All right reserved.

  This library is free software; you can redistribute it and/or
  modify it under the terms of the GNU Lesser General Public
  License as published by the Free Software Foundation; either
  version 3 of the License, or (at your option) any later version.

  This library is distributed in the hope that it will be useful,
  but WITHOUT ANY WARRANTY; without even the implied warranty of
  MERCHANTABILITY or FITNESS FOR A PARTICULAR PURPOSE.  See the GNU
  Lesser General Public License for more details.

  You should have received a copy of the GNU Lesser General Public
  License along with this library; if not, write to the Free Software
  Foundation, Inc., 51 Franklin St, Fifth Floor, Boston, MA  02110-1301  USA
*/


#include "Conceptinetics.h"


//
// CTC-DRA-13-1 ISOLATED DMX-RDM SHIELD JUMPER INSTRUCTIONS
//
// If you are using the above mentioned shield you should
// place the RXEN jumper towards pin number 2, this allows the
// master controller to put to iso shield into transmit
// (DMX Master) mode
//
//
// The !EN Jumper should be either placed in the G (GROUND)
// position to enable the shield circuitry
//   OR
// if one of the pins is selected the selected pin should be
// set to OUTPUT mode and set to LOGIC LOW in order for the
// shield to work
//


//
// The master will control 100 Channels (1-100)
//
// depending on the ammount of memory you have free you can choose
// to enlarge or schrink the ammount of channels (minimum is 1)
//
#define DMX_MASTER_CHANNELS   4

//
// Pin number to change read or write mode on the shield
//
#define RXEN_PIN                2


// Configure a DMX master controller, the master controller
// will use the RXEN_PIN to control its write operation
// on the bus
DMX_Master        dmx_master ( DMX_MASTER_CHANNELS, RXEN_PIN );


// the setup routine runs once when you press reset:
void setup() {

  // Enable DMX master interface and start transmitting
  dmx_master.enable ();

  // Set channel 1 - 50 @ 50%
  dmx_master.setChannelRange ( 1, 25, 127 );
}

// the loop routine runs over and over again forever:
void loop()
{
  static int dimmer_val;

  // Keep fading channel 1 in from 0 to 100%
  dmx_master.setChannelValue ( 1, 255 );
  dmx_master.setChannelValue ( 2, 150 );
  dmx_master.setChannelValue ( 3, 0 );
  dmx_master.setChannelValue ( 4, 150 );

  delay ( 100 );
}
LED-strip fade
#include "Adafruit_NeoPixel.h"
#ifdef __AVR__
 #include "avr/power.h"
#endif

const int numOfLeds = 60;
const int ledStripPin = 51;
float fadeAmount = 0.5;
float brightness = 0;

Adafruit_NeoPixel pixels( numOfLeds, ledStripPin, NEO_GRB + NEO_KHZ800);

void setup() {

#if defined(__AVR_ATtiny85__) && (F_CPU == 16000000)
  clock_prescale_set(clock_div_1);
#endif

  pixels.begin();

}

void loop() {

  for ( int i = 0; i < numOfLeds; i++ ) {
    pixels.setPixelColor( i, pixels.Color( 255, 255, 255 ) );
  }

  brightness = brightness + fadeAmount;

  if (brightness <= 0 || brightness >= 255) {
    fadeAmount = -fadeAmount;
  }
  pixels.setBrightness( brightness );

  pixels.show();

}
LED-strip snake
#include "Adafruit_NeoPixel.h"
#ifdef __AVR__
 #include "avr/power.h"
#endif

#define PIN 51

#define NUMPIXELS 60

Adafruit_NeoPixel pixels(NUMPIXELS, PIN, NEO_GRB + NEO_KHZ800);

#define DELAYVAL 50 // Time (in milliseconds) to pause between pixels

void setup() {

#if defined(__AVR_ATtiny85__) && (F_CPU == 16000000)
  clock_prescale_set(clock_div_1);
#endif


  pixels.begin();


}

void loop() {

  pixels.clear();

  for ( int i = 0; i < NUMPIXELS; i++ ) {

    pixels.setPixelColor( i, pixels.Color( 255, 255, 255 ) );
    pixels.setPixelColor( i - 1, pixels.Color( 100, 100, 100 ) );
    pixels.setPixelColor( i - 2, pixels.Color( 50, 50, 50 ) );
    pixels.setPixelColor( i - 3, pixels.Color( 10, 10, 10 ) );
    pixels.setPixelColor( i - 4, pixels.Color( 0, 0, 0 ) );

    pixels.show();   // Send the updated pixel colors to the hardware.

    delay( DELAYVAL ); // Pause before next pass through loop
  }

}